Nginx Server Setup Guide
Hey, Hello, How are ya? : )
Background Story Time
So recently (well as of the time of creation), I decided to follow the long way to do something, and that was upload a zip file (a dataset file) onto colab (google's .ipynb platform).
So basically, Instead of, just using the inbuilt file upload button, I decided to spend hours, learning about how to setup an nginx server on my system locally, and then use microsoft dev tunnel to port forward the server so that I can download it directly into colab using curl...
Only to encounter an error while downloading the file, and (of course) spend hours debugging that error. (Turned out dev tunnel only allows a max transfer of 512MB at a go).
And then spend a couple more hours trying to forward the server port using ssh, which was a HUGE mistake (don't ask me why), and then finally finding out about ngrok, that I finally used to forward the local server port, like a real MAN!!!!!!
ARGHHH!!! I'm so hyped right now!! I could fight a silver back gorilla, I could fight 2 silver back gorillas !! MANNNNNNN!!!!!
End of story ...
And naturally, I'm gonna show you just how I did this hehe.
So the basic work flow is like this:
- Install nginx
- Install ngrok
- Get the files you want to serve (I'm assuming it would be in a folder)
- Put the files (folder) in the
/var/wwwdirectory (I am also going to assume you're using a linux distro, I am using ubuntu) - Create config file for nginx server
- Create symbolic link for config file
- Launch nginx server
- Launch ngrok on port in which nginx server is running
Let's Get Started!!!!!
Step 1: Install nginx
we need nginx to serve the files locally on our system first. nginx is a web server, like apache etc. it's what you usually interact with when you go to a website online (or on localhost lol). It contains, some of the resources that a website requests for, like the pictures, html code etc.
To install nginx, run this command from your terminal:
sudo apt update
sudo apt install nginx
Then we need to adjust our firewall, to allow access to nginx service:
sudo ufw allow 'Nginx HTTP'
Now we can check to see if it runs fine:
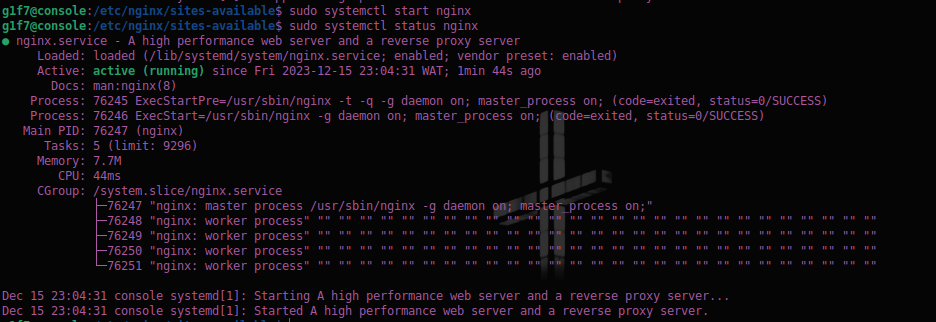
sudo systemctl status nginx
the output show look something like this:

From this image, we can see that although nginx is installed, it is inactive (your's might be active). This is because I turned it off (for now).
Next step is to activate it (start the service), using this command:
sudo systemctl start nginx
Now if we check the status of the nginx service, we should see this:
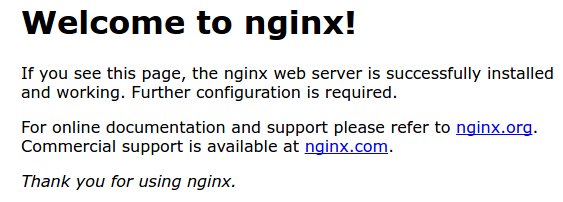
Now you can simply just go to localhost on port 80 (localhost:80) on your browser, and you'll see this page:
From the firewall service, apart from Nginx HTTP, we can also enable Nginx HTTPS and Nginx Full if they're available.
You can confirm this using the command:
sudo ufw app list
Step 2: Install ngrok
Installing ngrok is super easy just run this command in the terminal
sudo snap install ngrok
After this, you would need to get an auth token.
All you have to do is to sign up on ngrok here
And then get your token from here
Then run this to authenticate your ngrok agent:
sudo ngrok config add-authtoken <your token>
Step 3: Pushing files to the right directory
Now this is an Important step. The files that we want to serve, has to be moved to a different directory on your system.
Flash Back moment: So when I started serving the files on my end, they were originally in the /home/gift/Documents directory on my system. This causes an issue, because apparently, ngrok does not have permission to access the home directory. If you try it, you'll get a Permission Denied Error.
So all we have to do is to move the files (the folder, I'm going to say the folder from now on) to the /var/www directory. The reason for this is mainly because I noticed that the default nginx welcome page's html file, is in that directory inside the html folder. So I figured it would be best to just keep ours in the same directory as the html folder. ("I mean what could go wrong" ~Me, trying to jinx this setup for you lmao)
So if you've done this correctly, the new directory you want to serve should be:
/var/www/<your-folder>
After this, we have to modify the permissions in that directory. We basically need to set it so that other users and groups can read and execute the files in that directory.
You can check the current permissions by using this command on your terminal
ls -l /var/www/<your-folder>
to change the permissions for the files for other users and groups, we use:
sudo chmod o+rx /var/www/<your-folder>
Now other users (including the nginx server) can read and execute the files in that directory.
-
chmodbasically means change mode. It is the command we use to change file permissions -
o+rxbasically means add (+) read (r) and execute (x) privileges to other users (o) -
The last kind of privilege is the write privilege which is denoted with (w)
Step 4: Creating the config files for the server
Now, we need to created the server config file, and we would do this from the /etc/nginx/sites-available directory.
When you navigate to this directory on your terminal, You would notice that there is a default config file there already. You can check it out if you want. I'm not going to bother myself with that, but it is the config file that is responsible for displaying the default nginx welcome page.
Let's create our own.
on your terminal, enter this command to create a new config file:
sudo nano <any-name-you-want>
Now inside the file, write out these commands:
server {
	listen 90; #listen on port 90 -- you can use any free port you want
	listen [::]:90;

	server_name localhost; #server name localhost, to run server locally

	location / {
		root /var/www/<your-folder>; #this should be the root directory of the folder you want to serve
		index index.html; #this is the base html file that would be displayed if you come on the site
		try_files $uri $uri/ =404 #try ro locate file, if it doesn't exist, return 404
	}

}
Okay so the commands above are pretty simple:
- We first create a server block
- In the server block we specify the port we want the server to listen on. I've chosen port 90, (different from the default's post 80, to keep things simple).
listen 90;listens to IPv4 addresses, andlisten[::]:90;listens to IPv6 addresses. - the serve name has been set to localhost, because we want to run the server on our system. But if you have a registered domain name, you can always use that. It would simply look like this:
server_name your-domain.com - Then we define the location block
- In the location block, we specify the root directory, with the path to the folder we want to serve, that we moved to the
/var/www/directory earlier - Then the index file path, which is basically the first page that appears when you visit a website
- The last line, tried to locate URIs it basically gets the URI, and tries to search it with and without a slash appended to it's end. So let's say we have this URI:
example.com/index.html, it would search for:example.com/index.htmlif it does not find this file,- it would then search for
example.com/index.html/(notice the slash at the end). - If it does not find this path too, it would just return 404
Step 5: Create a symbolic link for the the config file
Now we have to create a symbolic link.
A symbolic link is a special kind of file that serves as a reference (pointer) to another file. Nginx used this because it makes it easier to access some files that might be in complicated directory path.
We would create the symbolic link in the etc/nginx/sites-enabled path. This is what the "main nginx config file" references (I'll show you what I mean soon).
To create the symbolic link we would use this command in our terminal:
sudo ln -s /etc/nginx/sites-available/<your-config-file> /etc/nginx/sites-enabled
Now if you check the main config file on this path etc/nginx/nginx.conf, on line 60 (or somewhere around there) you'd see this statement include /etc/nginx/sites-enabled.
This shows that the main config file for nginx, actually looks up the ./sites-enabled path in order to get the sites can be served.
In other words, if you don't create a symbolic link to the ./sites-enabled path, the nginx server would not find it. This is one of the reasons why creating a symbolic link is important.
Step 6: Launch nginx server
Now that we have basically concluded with the server setup, we van launch the server using this command. but before that we should test the configuration, to catch any syntax errors:
sudo nginx -t
Now we can start the server
sudo systemctl start nginx
Step 7: Launch ngrok
Now we have to forward the port, to make it accessible from anywhere on the internet. Doing this with ngrok is super easy, like so:
ngrok http 90
with this command we would create a http connection to port 90 on our local machine.
Remember we are using port 90 here, because in the config file we wrote earlier, we set the server to listen at port 90.
If the command runs successfully, we should get an output like this:
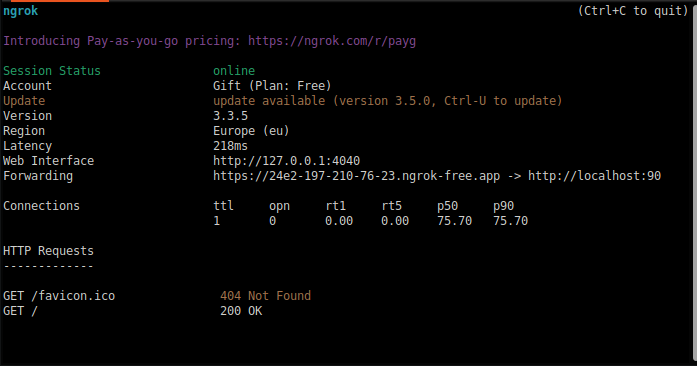
The link we would share with our audience, is the link on the Forwarding line, in my case: https://24e2-197-210-76-23.ngrok-free.app/
Extra Tips
You can also view the access logs and the error logs for your server using these commands
Access Logs:
sudo tail -f /var/log/nginx/access.log
Error Logs:
sudo tail -f /var/log/nginx/error.log
And with this you have successfully set us an nginx server locally and forward it to the internet.
Well that's all for now
Bye bye
URI
A Uniform Resource Identifier (URI), to put simple, is a sequence of characters that helps us identify a resource online (this resource can be logical, or physical). You can literally use it to Identify anything.
A URI is broken down into 2 maim categories: URL (Uniform Resource Locator) and URN (Uniform Resource Names)
In conclusion, a URI can be used to identify any type of resource, not just those on the internet.
For more info, visit here